Showing posts with label repurposing. Show all posts

1/20/11

Upcycled Sweaters

Pin It
Before you go throwing out your old, unwanted sweaters, think again. Here are some amazing upcycled sweater projects that could turn even the ugliest of sweaters into something cute and functional!


These sweater pillows made by Brassy Apple look so high end!


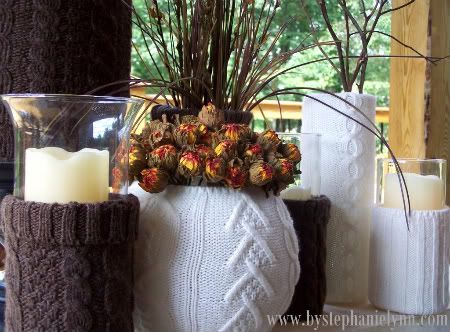
Love this idea from Stephanie over @ Under The Table And Dreaming, what a neat way to dress up boring vases!


Upcycledorganizers14

Who would guess that under this sweater facade there was an empty macadamia nut can! See more @ Yesterday On Tuesday


Love these super cute wrist warmers over @ Craftoholics Anonymous


This wreath makes my heart skip a beat! I am smitten with the colors and textures! See how you can make your own @ Decorating Addiction


A baby can never have too many warm hats! These ones are SUPER cute, and lets be honest, the baby is pretty cute too! Get the full tutorial @ Last Train To Pooksville


I want these boots! You'll be surprised at how simple they are to make! Check them out over @ Craftster

To have your ideas featured on Crazy Domestic, click HERE

1/11/11

A To Do List made from an iTunes Gift Card from Sew Many Ways

Pin It
I think this is such a clever upcycle! Karen, from Sew Many Ways took this:
...and made this:


See her step-by-step tutorial HERE and get even more fun ideas from Karen on her site


 To have your ideas featured on Crazy Domestic, click HERE

11/29/10

Road Trip Travel Trays

Pin It
We went out of town for Thanksgiving, and we have another road trip planned for Christmas. Normally we just let the kids watch movies while we drive, but I wanted to have something else for them to do this time, especially since my kids are only 3 and 1 1/2 years old, and don't quite play most road trip games yet AND our Christmas drive will be 18 hours...SOOO...I made some Road Trip Trays!


I picked up two cookies sheets at the dollar store and spray painted them with Krylon Chalk Board paint that I FINALLY found at Ace Hardware. Super simple! I love these trays because they are fun and multi-functional!

Option 1 is A COLORING TRAY. I got some clamp magnets at the dollar store. The crayon holder is actually a note card holder I picked up on clearance at Walmart for .75¢ Traditional coloring pages don't fit, so I trimmed some down and brought some plain white paper to color on.

I just hot glued some magnets onto the back of the "crayon case" to help it stay put.

Option 2, A RACE TRACK FOR CARS! My little boy is in LOVE with cars, so this was a good option for him, I just colored the track on with chalk and brought along a few of his favorite cars to use.

Option 3, A TRADITIONAL CHALK BOARD. I did the same thing with the chalk as I did with the crayons and hot glued magnets on the back to help them stay on the tray. I just brought some soft rags to wipe them clean.

Option 4 is A MAGNET BOARD, bring along number and letter magnets, paper doll magnets, laminated shapes to match, you name it! My kids are always playing with the magnets on the fridge, this just made it portable!

No picture of Option 5, but you can use these as SNACK AND DRINK TRAYS! It helps keep SOME of the mess off the floor!

The best part about these is that when you are done using them, you can just stack them up and slide them right under the seats! Happy Holidays and sane safe travels!

To have your ideas featured on Crazy Domestic, click HERE

11/15/10

Old Tv Transformation with Home Hinges

Pin It
I'm absolutely in love with this project I found by April of Home Hinges. I was so excited I stumbled across her blog, she actually shares it with her four sisters! How fun is that? All the girls contribute with their current projects and great ideas, seriously a fun, fun blog! Here's April with her amazing TV transformation!


Here’s a teaser of the final product. But this isn’t what it originally looked like. In fact it looked very, very different.

TV Hutch final

My fist impression was that someone had left their garbage in the front yard with the hope someone would take it. The box sat there for several days because who in their right mind would want THAT.

Curbside TV

It was an OLD TV. Like the kind I remember from when I was five. The kind you actually had to walk up to in order to turn the dial to change the channels.

Curbside TV Knobs

This kind of TV that only had 13 or 14 channels and only half had a signal.

I was not initially inspired, thus I too drove past it on my merry way for several days. But I recently saw Beckie’s transformation of a similar piece on her blog Infarrantly Creative , which got my little brain churning. If she could do it… What’s to lose? So in the middle of a horrific rain storm, the kind we only get two or three times a year, I zoomed over to the curb on which this pathetic thing sat.

I’m the polite kind of scrounger so I ran up to the door, still in my exercise clothes, my hair barely brushed and in a pony tail, and rang the doorbell. They said I could have it for free as well as a gun cabinet they had just thrown in a dumpster in the driveway. See its transformation into a dining room hutch here.

The couple at the home were getting ready to move and getting rid of a lot of stuff. They were happy to help me load my finds into the back of my minivan. The only problem, particularly with the TV was that it was too heavy to get out of the car by myself.

Like it was full of rocks, REALLY HEAVY.

Not wanting to wait until my sweet Sports Addict got home (because he would think I had finally lost my mind), I decided to just start gutting it right there in the car with the hope that once it was gutted I could muscle the frame out myself.

Taking apart the TV

After about a bazillion screws and cutting lots of wires it came.

Some of the guts

Some of the guts

After about an hour’s worth of work and just a few scratches, I successfully extracted the shell from the minivan. Remember a lot of this was going on in intermittent rain. No worries though. My neighbors already know I’m nuts.

The TV shell

At this point I was just hoping this wasn’t a huge mistake. But if Beckie could do it…

Thus pushing ahead I used scraps of materials in the garage to make a box inside the shell. Since I thought it would be nice to use for piano music I decided to put in vertical dividers. I just hate it when books fall over into a pile and I’ve found vertical dividers on shelves really help with this. It also made sense since sheet music is often very tall.

TV interior with dividers

Vertical dividers before getting their front edge trim

I also trimmed out the front to hide the plastic molding used to attach the TV to the frame.

Molding on TV

Molding to hide the unsightly edges of the TV shell

So after caulking it was finally ready to prime and paint.

Ready to Prime

I didn’t put the back on until the end so I could paint from both the front and back. It made it easier to paint the interior. I used some Kilz 2 primer I had on hand and some “oops” paint I mixed together to get this lovely grayish-blue.

Painted gray-blue

Once that was dry I went over the whole piece with a cream color I used on my roadside mirror. I just dry brushed on the cream color, highlighting the molding of the old TV shell and giving it a little bit of a brushed over look.

Molding detail

In the end my wonderful Sports Addict is no longer questioning my sanity, and I have a beautiful new hutch for holding all the piano music that used to be spilling over the top of the piano.

TV Hutch final 2

The best part though it that it was 100% FREE.

I didn’t spend a single cent on this. Everything I used was already in the garage either from old projects or left from previous owners of the home. Not only did I save at least part of the TV from the landfill, but I reused items that might have eventually been thrown away in the garage. Free and better for the environment. I’m just going to go pat myself on the back again as I admire my new living room furniture.

April

CAUTION: I’ve been told there is a part in some of these old TV’s that may hold a charge even if the TV has been unplugged for a while. Taking one of these apart could result in electrocution.

Here are some more great posts from the ladies of Home Hinges

Gun Cabinet turned Dining Hutch


A look at Real Life

Thanks April, for sharing with us today!

To have your ideas featured on Crazy Domestic, click HERE
10/21/10

Chalkboard Paint

Pin It
It's nothing new, we've all seen a million walls, tables, etc done with chalkboard paint, but check out these fresh ideas! I'm loving all of them!

This project makes me what to go out and get myself a piano, I've seen several of them on craigslist for FREE...now if I only had the space in my house! Check it out @ The Modern Hive

Make your own custom colored chalkboard paint! Find out how @ Martha Stewart

What a cool way to organize! I love that you can change the contents of the box and name on the label so easily! See it over @ Less Than Perfect Life of Bliss

I love everything over @ First A Dream, see how she transformed a screen door into this chalkboard! I love the size and how it frames it out!

The always impressive Amy @ The Idea Room has done it again, check out her chalkboard notebook!

These chalk rocks from Pottery Barn would be super simple to make yourself! I love to think of the endless possibilities these have!

Globes turned chalkboards over @ Natalie Putnam. She used these for a Star Wars party to let the kids "create their own planets"! How cute is that?

Now I just need to get over to Home Depot to pick up some chalkboard paint!


To have your ideas featured on Crazy Domestic, click HERE

10/14/10

Silverware Trend

Pin It
Have you noticed all the decorating and repurposing that has been going on lately with silverware? I've seen it all over! Here are some of the unique ideas I've seen popping up!

•••

I love the colors of this spray painted silverware kitchen art @ crap I've made
Deanne, over @ Five Brothers One Sister framed out heirloom silverware!

Apartment Therapy has the tutorial on how to make your own silverware chandelier!

See how simple it is to make this cool spoon hook @ Secret Pie Shoppe


Get the tutorial for this cute recipe binder over @ Flamingo Toes


Learn how to stamp your own silverware garden markers @ life hacker
I fell in love with these cute bride and groom silverware on Beach House Living's etsy shop


Love this wooden fork and spoon redo @ Random Thoughts of a SUPERMOM


To have your ideas featured on Crazy Domestic, click HERE